
Search Results:
Let's get started!
NIOX PRO® is a portable device that is designed with both healthcare professionals and patients in mind. Set-up is simple so you’ll be testing FeNO in no time. You can watch the set-up video below or scroll down further for written instructions.
No alcohol
FeNO testing devices are very sensitve to alcohol. Please ensure that you do not clean the device with any solutions containing alcohol. Learn more here.
Step one: Setting up the device
In this section discover how to set up the device, including installing the NIOX® Sensor, attaching the Handle Holder and Breathing Handle, and starting your NIOX PRO®.
Opening the box
- Open the NIOX PRO® box and removes both trays from the package with care.
- Take the NIOX PRO® out of the tray and remove the plastic film from the display.
Install the NIOX® Sensor
- Place the device with the display facing down on a flat, clean surface.
- A flat head screwdriver is required for opening the compartment lid on the back of the device. Unscrew and remove the compartment lid.
- Open the sensor can. Take care when completing this step as the inside of the opening may have sharp edges.
- Open the sensor package and reach into the pouch containing the sensor. Carefully remove the sensor without touching the white circle membrane.
Note: The sensor should be stored in its original unopened packaging or installed in a NIOX PRO® device. - Turn the orange swivel counterclockwise. Insert the sensor and turn the orange swivel clockwise until locked.
- You might need to apply light pressure to completely insert the sensor.
- You will not be able to lock the sensor with the orange swivel until the sensor is fully inserted.
- If you are unable to replace or secure the lid, check the orange swivel is completely rotated to lock the sensor in place.
- Replace the lid and tighten the screw by using a screwdriver.

Connect the Handle Holder and Breathing Handle
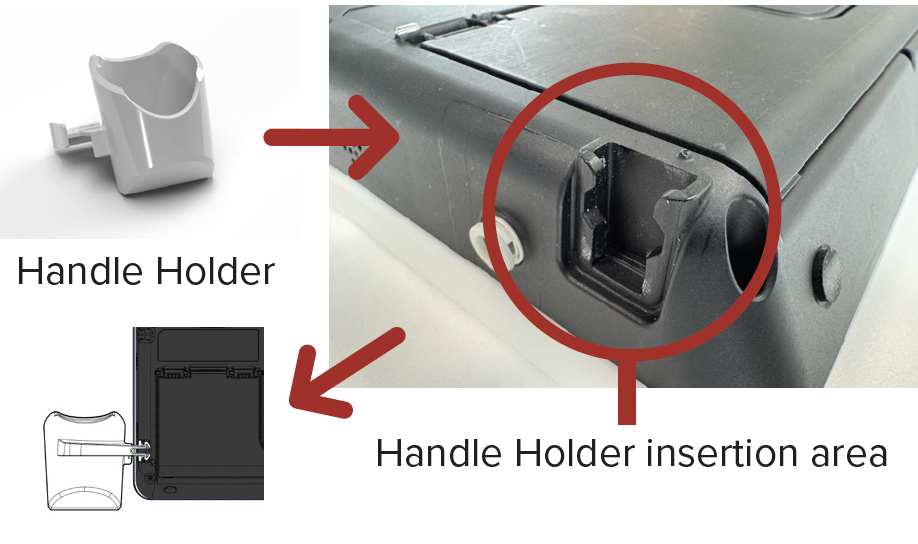
- Take the Handle Holder out of the box and push it into the Handle Holder slot on the back of the device. Some force may be required.
- Position the device with the stand, located at the back of the device, folded out.
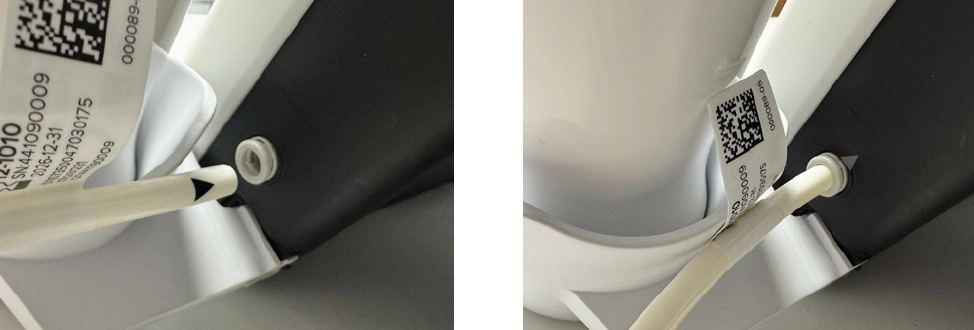
- Take the breathing handle tube and push the end of the tube into the breathing handle port slowly until the black triangle is no longer visible.
- The breathing handle port is behind the handle holder.
- Unscrew the cap on the Breathing Handle by turning counterclockwise.
- Place with the tube pointing upwards into the handle holder.
- Twist the breathing handle clockwise to lock into place.
Start NIOX PRO®
- Select the outlet adapter for your region and attach it to the power cord.
- Attach the power adapter to the device and then to the power outlet.
- Start the device by pressing and holding the power button for a few seconds.
- Allow the device to perform its start-up checks.
Completed this step?
Step two: NIOXOS™ Settings
Learn how to tailor your device settings with NIOXOS, including selecting regional location, as well setting the time and date.
Regional configuration
Upon the first start-up of the device, the regional configuration screen appears.
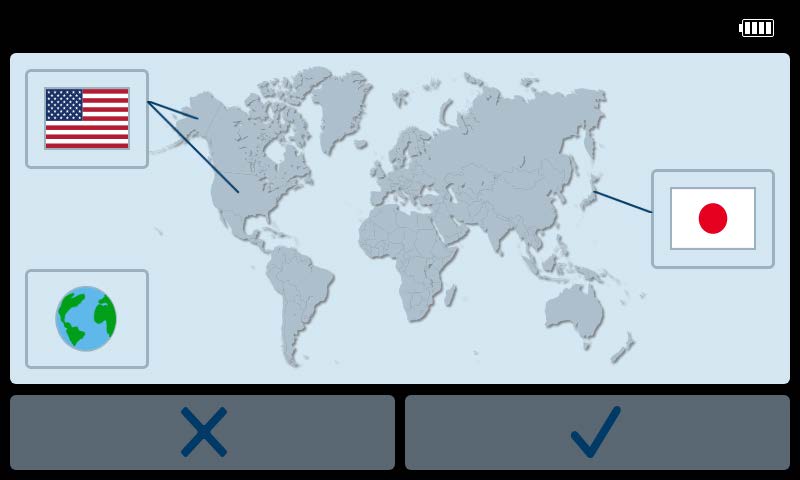
- There are three regions, the United States, Japan and Global. Tap on the flag / icon that indicates your region.
- Select the checkmark icon to confirm your region selection.
Set the date and time
Next the time and date will then appear on the screen, follow these steps:

- Select between 12h and 24h time and date format.
- Set time by tapping the button for hour and minutes. It changes colour to blue. Change the value to the current hour by tapping the (+) and (-) buttons.
- Select between 12h and 24h time and date format.
Note: If 12h is selected, tap toggle between AM and PM when setting the time. - Repeat this process to set the month, day and year.
- Select the checkmark icon to confirm the date and time settings.
Completed this step?
Step three: Sync Breathing Handle
You need to sync your breathing handle to the NIOX PRO® device. This is important to ensure that the device can calculate the lifetime of the handle.
- Select the settings icon on the home screen:

- Select the reset breathing handle icon in the top right corner of the settings screen:

- Select the right side of the screen to begin breathing handle sync.
- Select the checkmark at the bottom of the breathing handle instructions confirmation screen.

To return to the home screen, tap the return icon twice, located in the top left of the screen: 
Completed this step?
Now you are ready to start testing!
Well done, you have now set-up NIOX PRO® and are ready to start testing FeNO in your practice.
Celebrate with us Next: How to test FeNOContact NIOX® Customer Services
Submit your details so that we can help you.
Support Checklist:
You've completed all the steps!

Track your progress.


* NIOX®. Data on File; MKT-DOF-007. 2024.
NIOX® Customer Support and Training
At NIOX® we are passionate about providing excellent support and training.


